Archive for January, 2008

Not TIF but other things…

January 30, 2008

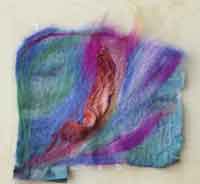
In line with my promise to blog at least once a week I decided this week to post what else I’ve been up to this month. Starting with a bit of discharge dyeing…

discharge

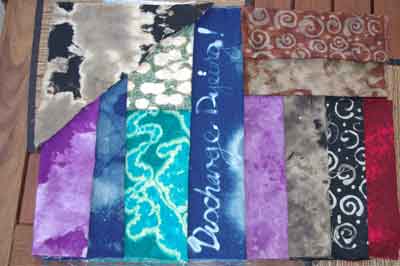
Lots of fun but very smelly! Next time I will be using sodium metabisufite instead of vinegar. Also I recommend checking your equipment BEFORE starting! I had a syringe that was sticky and so the bleach splodged instead of flowed and a spray bottle that just wouldn’t..well you know..spray!! It is really amazing how different each fabric reacts to bleach. In some cases nothing happened at all, in others the most wonderful colour resulted. I now have a thickening agent to make bleach paste so that’s the next development for discharge dyeing – stamping and stenciling with the thicker bleach. Results using the Clorox bleach pen were mixed as sometimes it would flow and other times it splodged but I think that might also be practice.

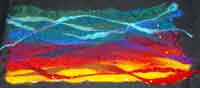
Otherwise I’ve been painting lutradur…

lutradur painted

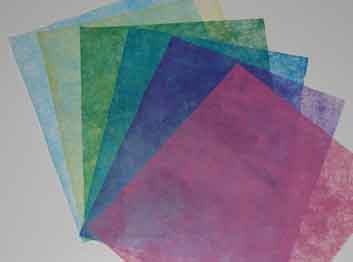
Its the 30gsm version so I can do a bit of layering with it. Next is to rag roll a bit of metallic paint over them and then hit it all with a soldering iron to see what happens. Also want to bit of stitching over it. Who knows it may end up in next month’s challenge!

On another topic has anyone done/doing the Opus School of Textile course “Exploring Embroidery”? Its an online/distance course and I was wondering what people thought about it. Its a bit of an investment so if anyone is or has tried a module I’ll be really interested in your opinion.

That’s it for this week. Looking forward to finding out the next challenge from Sharon B on Friday.

Take it Further Jan – Finale

January 23, 2008

Got back to the piece after a bit of a break. Lightly attached some more stabilizer to the back and then after mulling over Val CH’s Stitch Techniques book I chose whip stitch. Whip stitch allowed the colour of the piece underneath to still be evident. Also I haven’t used that stitch before, having favoured cable over it. So again another reason for choosing the stitch is that it pushed my own practice to explore those areas previously ignored. So to begin with a little practice…whip stitch sample

I used a clear synthetic thread on top and a varigated rayon underneath on the bobbin. I was really pleased with the result so I got to looking at colours for the piece.

colours of thread

Blues, pinks and greens appeared to be the order of the day and the stitching confirmed it! I decided to echo the shape of the silk rod as it was the dominate part.

On the machine

As I stitched I checked how the piece was coming along using the two right angle pieces of card. At this stage I’m concentrating on making the piece about postcard size. A detail of the stitching…

detailJanblog

I choose to alternate the colour of the whip stitch lines to provide a bit more interest.

Lastly I then looked at the orientation and what part of the piece would make up the final postcard for January.

pcard1pcard2

I like the one on the left the most but the more I looked at the piece the more a rectangular shape just didn’t seem right. I had an empty frame sitting on the table – square, and it was begging for a piece of its own to frame so I relooked at the piece picking out a square from it instead (there goes that postcard idea!).

squarepcard

So this is my piece for January’s take it further challenge. I can see clearly how to develop this piece into a major work. It is so reminiscent of a landscape from the air. The silk rod are the hills and the whip stitch potentially a river or the contours of the land. In all I’m happy with this little experimentation that was inspired by Valerie Campbell-Harding’s attitude to textiles – take it further!

Take it Further – Or backwards!

January 16, 2008

Its dangerous to let one’s textile buddies in on what one is doing! I showed the piece I had needfelted the other day to my textile friends and they all said – dissolve it now! They wanted to see if the fibres would hange together despite the lack of overlapping material (i.e. most fibres going in the same direction).  So I duly dissolved it. I must admit I wondered what would happen too, the worst being that I could be left with a pile of silk fibres.

I am happy to report that the piece hung together! Amazing really considering how some parts barely have any fibres at all.

dissolved fabric

Here it is on its drying mat. I also took the opportunity to think about what part of it I would actually use by using two right angle pieces of card to block out sections. Some areas are really thin as shown in this next image where I placed one of the pieces of card underneath the piece.

fabric back

This is a picture of the back, the white areas show where the piece is really thin. I like the fragile nature of this however to stitch any further guess what I need to do? That’s right I need a stabilizer again. I wonder how its going to go getting wet twice! As I work through this piece I realise that I like to think with thread and fabric rather than pencil and paper. This means that the piece may help me resolve what I want to do, but may not be what I ultimately choose to do. Working small helps me get over the “precious”ness of using up material to work this way.

Now…stitching…off to check out Val C-H’s Stitch Techniques book to get some inspiration.

On another line of thought – am I the only one who goes back to edit one’s blog to correct typos? Should I be bothering?! I always spot one 5 secs after I’ve posted…

Take It Further – Development

January 9, 2008

Mulled over what the work of Valerie Campbell-Harding really means to me. It is the pushing of boundaries that I really admire. I have been needlefelting for a while now, doing the usual stuff like:

Typical needlefelt

 but not really challenging what is possible so I decided to needlefelt onto dissolvable film with silk in various forms – tops, paper and rods. Resulting in:

jan1_b1.jpg

The next stage is the stitching. Val’s stitching was always intense, creating the most amazing stitched pieces. So the next stage is to stitch this. So I had a practice on the film to remind myself what to do and check how the film dissoved. Here’s a little grid:

grid

The more dense areas were still quite stiff after dissolving the film for 20 minutes however this gave the grid a firm handle.

Next decision is whether to use thread that stands out (“look at me”) or thread that disappears into the colour of the silk. I’m leaning towards the latter at this stage as the density of the stitching should give the effect of movement across the piece. Hmm…let go of the perfectionist genie – time to take it further! If I don’t like it I can always chop it up!

Take it Further – January

January 5, 2008

Who do I admire? Hmm…the first name that came to my head was Valerie Campbell-Harding because she lifted embroidery out of the doldrums, continually expanded on her textile practice and just kept going until the end. There was no “I’m too old for this!” or stagnation in her work. I think my piece for January will be a little tribute to Val’s gift to all textile enthusiasts.

I’ve decided in order to keep it managable (and thus more likely to end up with a result), that all my pieces will be postcard size. Now for a little research by looking at all the books I have authored by her.